/PathFinding
(Created page with "{{sign|[!train]|station||route}}") |
(Created page with "=== 调试 ===") |
||
| Line 79: | Line 79: | ||
=== 调试 === | |||
=== | |||
<div lang="en" dir="ltr" class="mw-content-ltr"> | <div lang="en" dir="ltr" class="mw-content-ltr"> | ||
Revision as of 04:03, 9 September 2024
介绍

通过自动切换轨道,列车理论上可以到达 Minecraft 世界中的任何位置。通过放置控制牌来配置轨道网络拓扑,预先配置的列车将遵循该拓扑来到达目的地。
列车到达的地点被称为目的地,由目标牌指定。切换轨道的位置以及终点的位置被称为节点,由转辙器指定。如果要强制某段轨道路线只能单向行驶,可以设置阻挡器来阻挡反方向驶来的列车。
开始
指定目的地
可以在目标牌的第三行输入目的地的名称,第四行可以填写新的目的地名称来为经过的列车设置新的目的地,但你也可以留空不设置。
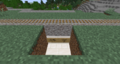
车站与目标牌。当列车到达此地时,会停留30秒,然后向右驶出。

指定切换节点
轨道分叉口应该放置一个始终开启的转辙器。当有一辆设置了目的地的列车经过时,转辙器会计算出一条路线,然后切换轨道。
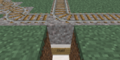
转辙器会自动切换轨道来决定列车要前往的任何 3 个方向。

强制单向行驶
当希望某条轨道上只能单向行驶时,可以使用始终开启的阻挡器,这个方法在有并排的轨道上时很有用,每条轨道只能沿着一个方向行驶,路线查找会自动忽略被阻挡器阻挡的路线,使之不会出现驶错轨道的问题。
![使用 [+train:left] 只会允许从右向左行驶的列车。同样,你也可以使用 [+train:right] 阻挡从右驶来的列车。](/thumb.php?f=Pathfinding_Blocker.png&width=120)
使用 [+train:left] 只会允许从右向左行驶的列车。同样,你也可以使用 [+train:right] 阻挡从右驶来的列车。
![使用 [+train:left] 只会允许从右向左行驶的列车。同样,你也可以使用 [+train:right] 阻挡从右驶来的列车。](/p/File:Pathfinding_Blocker.png)
测试一下
在轨道上放置一辆矿车,并使用目的地指令设置一个目的地:
/train destination [名称]
/train destination output
现在将矿车推到转辙器,观察它是如何切换轨道,并发往目的地的。你可以再次设置目的地,并推向转辙器。可以继续尝试多个转辙器、阻挡器和目标牌。
如果出现转辙器发错方向等问题,可以使用重置调度指令进行强制重新计算调度路线。
/train reroute
也可以使用属性牌设置目的地:

高级设置
一旦理解了基础系统的运作,那就可以进一步讨论更高级更复杂的功能了。
有用的侧功能
保持区块加载
当列车上没有任何玩家且周围没有玩家加载区块时,可以开启列车的保持区块加载属性来防止列车被游戏卸载。
在属性牌上你可以这样写:
或你可以创建一辆列车,使用/train keeploaded true并通过/train save <名称>来将列车保存在这个已保存的名称下。你可以使用生成器批量生成这个名称的列车。
等待距离
为了避免列车碰撞且保持列车之间的距离,可以使用等待距离属性。
闭塞区间
闭塞区间能避免交叉路口内的列车碰撞。
车站调度
车站可以将列车发往下一个目的地。
调试

The plugin offers a debug stick with which path finding information can be displayed. Use the stick item to click on rails to show information about the route(s) that can be taken. Sneak (shift) while clicking performs a reroute, which recalculates the track reachable from where you clicked. If you have multiple smaller rail networks, this can be more efficient than executing the global reroute command.
All destinations
Use the following command to get a stick item that displays all destinations reached from a given track:
/train debug destination
The track clicked is followed until a node of the track network is found, after which all routeable destinations are listed. For every destination the total distance to it is listed, and particles are displayed leading into it. If you find that a certain destination is not listed that should be, you can move further along the track clicking occasionally to find where the break is.
A single destination

Use the following command to debug a specific destination:
/train debug destination [destination]
Now when you click on the track, particles are displayed what route is taken to reach the destination. This is useful when debugging a specific destination so no particles are displayed for routes and destinations that aren't relevant to you.
Route Manager
Normally only one destination is set at a time. It is possible to set the next destination to go to on the destination sign itself, but that means you can only have one possible route. With the route manager a list of destinations to visit can be configured, and then applied to trains. Trains will then go down this list, advancing it every time they pass by a destination on it.
Commands
First, edit a train, then use the following commands to set a list of destinations:
/train route set [destination1] ([destination2] [destination3...])
/train route set outpost hillfort dungeon

To add additional destinations to the existing route, or to remove them, use these commands:
/train route add [destination1] ([destination2] [destination3...])
/train route remove [destination1] ([destination2] [destination3...])
You can then use the destination command or property to start the route at a desired destination. Otherwise, the route is started from the beginning the moment the train hits a destination sign. To inspect the route of a train, use the base route command. The current destination the train has is highlighted green.
/train route

Persistence
The route of a train can be saved globally under a name so it can later be applied to other trains instantly.
/train route save [name]
To load a saved route, this command can be used:
/train route load [name]
Alternatively, it can be done using a property sign as well: