/PathFinding
m (1 revision imported) |
(Prepared the page for translation) |
||
| Line 1: | Line 1: | ||
[[TrainCarts|« Go back]] | <languages/> | ||
<translate> | |||
[[Special:MyLanguage/TrainCarts|« Go back]] | |||
== Introduction == | == Introduction == | ||
[[Image:Pathfinding.png|thumb|right|Setup of 3 destinations and a switcher sign to route trains between them]] | |||
[[Special:MyLanguage/Image:Pathfinding.png|thumb|right|Setup of 3 destinations and a switcher sign to route trains between them]] | |||
Trains can be routed to different locations in the Minecraft world by automatically switching the track. By placing signs the track network topology is configured, which pre-configured trains will follow to reach their destination. | Trains can be routed to different locations in the Minecraft world by automatically switching the track. By placing signs the track network topology is configured, which pre-configured trains will follow to reach their destination. | ||
Locations trains can go to are known as ''Destinations'', which are designated using [[TrainCarts/Signs/Destination|destination signs]]. Locations where track is being switched, as well as the end-locations, are known as ''Nodes'' in the network, which are designated using [[TrainCarts/Signs/Switcher|switcher signs]]. To enforce a single direction on the tracks, [[TrainCarts/Signs/Blocker|blocker signs]] can be employed, which disables routes that go against the flow of traffic. | Locations trains can go to are known as ''Destinations'', which are designated using [[Special:MyLanguage/TrainCarts/Signs/Destination|destination signs]]. Locations where track is being switched, as well as the end-locations, are known as ''Nodes'' in the network, which are designated using [[Special:MyLanguage/TrainCarts/Signs/Switcher|switcher signs]]. To enforce a single direction on the tracks, [[Special:MyLanguage/TrainCarts/Signs/Blocker|blocker signs]] can be employed, which disables routes that go against the flow of traffic. | ||
== Getting Started == | == Getting Started == | ||
=== Designate the destinations === | === Designate the destinations === | ||
Start by placing down destination signs with a name for the destination on the third line. The fourth line can be used to set a new destination to go to once a train goes over the sign, but can be left empty. | Start by placing down destination signs with a name for the destination on the third line. The fourth line can be used to set a new destination to go to once a train goes over the sign, but can be left empty. | ||
<gallery mode="slideshow"> | <gallery mode="slideshow"> | ||
File:Pathfinding_Destination.png|Station with destination sign. Trains can go here, are stopped for 30 seconds, then move on to the right. | File:Pathfinding_Destination.png|Station with destination sign. Trains can go here, are stopped for 30 seconds, then move on to the right. | ||
</gallery> | </gallery> | ||
=== Designate the switched nodes === | === Designate the switched nodes === | ||
Places where the track should be switched need to have an always-powered switcher sign placed. Now when a train moves over it that has a destination set, a route will be calculated and then the track is switched. | Places where the track should be switched need to have an always-powered switcher sign placed. Now when a train moves over it that has a destination set, a route will be calculated and then the track is switched. | ||
<gallery mode="slideshow"> | <gallery mode="slideshow"> | ||
File:Pathfinding_Switcher.png|Switcher sign will automatically switch the track to go from/to any of the 3 directions. | File:Pathfinding_Switcher.png|Switcher sign will automatically switch the track to go from/to any of the 3 directions. | ||
</gallery> | </gallery> | ||
=== Enforce one direction === | === Enforce one direction === | ||
When it is desirable that trains only ever go in one direction over a piece of track, an always-powered blocker sign can be used. This is useful when having two tracks side-by-side, each going in opposing directions. The path finding system will automatically ignore paths that are blocked by blocker signs. | When it is desirable that trains only ever go in one direction over a piece of track, an always-powered blocker sign can be used. This is useful when having two tracks side-by-side, each going in opposing directions. The path finding system will automatically ignore paths that are blocked by blocker signs. | ||
<gallery mode="slideshow"> | <gallery mode="slideshow"> | ||
File:Pathfinding_Blocker.png|With ''[+train:left]'' trains coming from the left are blocked, only allowing movement from right to left. Similarly, ''[+train:right]'' and other directions can be used. | File:Pathfinding_Blocker.png|With ''[+train:left]'' trains coming from the left are blocked, only allowing movement from right to left. Similarly, ''[+train:right]'' and other directions can be used. | ||
</gallery> | </gallery> | ||
=== Test it out === | === Test it out === | ||
Place down a minecart on the track, and use the [[TrainCarts/Commands#Destination|Destination command]] to set a destination: | |||
Place down a minecart on the track, and use the [[Special:MyLanguage/TrainCarts/Commands#Destination|Destination command]] to set a destination: | |||
<pre>/train destination [name] | <pre>/train destination [name] | ||
/train destination output</pre> | /train destination output</pre> | ||
Now give the minecart a push towards the switcher sign, and observe how it will automatically switch the track to send the train towards the destination. You can change the destination again and send it to the switcher again. Continue to experiment with multiple switchers, blockers and destinations. | Now give the minecart a push towards the switcher sign, and observe how it will automatically switch the track to send the train towards the destination. You can change the destination again and send it to the switcher again. Continue to experiment with multiple switchers, blockers and destinations. | ||
If you run into a problem where the switcher appears to make a mistake, use the [[TrainCarts/Commands#Reroute|Reroute command]] to force a recalculation of all routing information: | If you run into a problem where the switcher appears to make a mistake, use the [[Special:MyLanguage/TrainCarts/Commands#Reroute|Reroute command]] to force a recalculation of all routing information: | ||
<pre>/train reroute</pre> | <pre>/train reroute</pre> | ||
It is also possible to use the property sign to set a destination: | It is also possible to use the property sign to set a destination: | ||
</translate> | |||
{{sign|[+train]|property|destination|outpost}} | {{sign|[+train]|property|destination|outpost}} | ||
<translate> | |||
== Advanced == | == Advanced == | ||
Once the basic system is understood, there are some more complicated features to discuss. | Once the basic system is understood, there are some more complicated features to discuss. | ||
=== Debugger === | === Debugger === | ||
[[File:Pathfinding_Debug_Destinations.png|thumb|Displays the destinations with a distance to them]] | [[File:Pathfinding_Debug_Destinations.png|thumb|Displays the destinations with a distance to them]] | ||
The plugin offers a ''debug stick'' with which path finding information can be displayed. Use the stick item to click on rails to show information about the route(s) that can be taken. Sneak (shift) while clicking performs a ''reroute'', which recalculates the track reachable from where you clicked. If you have multiple smaller rail networks, this can be more efficient than executing the global reroute command. | The plugin offers a ''debug stick'' with which path finding information can be displayed. Use the stick item to click on rails to show information about the route(s) that can be taken. Sneak (shift) while clicking performs a ''reroute'', which recalculates the track reachable from where you clicked. If you have multiple smaller rail networks, this can be more efficient than executing the global reroute command. | ||
==== All destinations ==== | ==== All destinations ==== | ||
Use the following command to get a stick item that displays all destinations reached from a given track: | Use the following command to get a stick item that displays all destinations reached from a given track: | ||
<pre>/train debug destination</pre> | <pre>/train debug destination</pre> | ||
The track clicked is followed until a ''node'' of the track network is found, after which all routeable destinations are listed. For every destination the total distance to it is listed, and particles are displayed leading into it. If you find that a certain destination is not listed that should be, you can move further along the track clicking occasionally to find where the break is. | The track clicked is followed until a ''node'' of the track network is found, after which all routeable destinations are listed. For every destination the total distance to it is listed, and particles are displayed leading into it. If you find that a certain destination is not listed that should be, you can move further along the track clicking occasionally to find where the break is. | ||
==== A single destination ==== | ==== A single destination ==== | ||
[[File:Pathfinding_Debug_Destination_Specific.png|thumb|Displays the precise route to one destination]] | [[File:Pathfinding_Debug_Destination_Specific.png|thumb|Displays the precise route to one destination]] | ||
Use the following command to debug a specific destination: | Use the following command to debug a specific destination: | ||
<pre>/train debug destination [destination]</pre> | <pre>/train debug destination [destination]</pre> | ||
Now when you click on the track, particles are displayed what route is taken to reach the destination. This is useful when debugging a specific destination so no particles are displayed for routes and destinations that aren't relevant to you. | Now when you click on the track, particles are displayed what route is taken to reach the destination. This is useful when debugging a specific destination so no particles are displayed for routes and destinations that aren't relevant to you. | ||
=== Route Manager === | === Route Manager === | ||
Normally only one destination is set at a time. It is possible to set the next destination to go to on the destination sign itself, but that means you can only have one possible route. With the route manager a list of destinations to visit can be configured, and then applied to trains. Trains will then go down this list, advancing it every time they pass by a destination on it. | Normally only one destination is set at a time. It is possible to set the next destination to go to on the destination sign itself, but that means you can only have one possible route. With the route manager a list of destinations to visit can be configured, and then applied to trains. Trains will then go down this list, advancing it every time they pass by a destination on it. | ||
==== Commands ==== | ==== Commands ==== | ||
First, edit a train, then use the following commands to set a list of destinations: | First, edit a train, then use the following commands to set a list of destinations: | ||
<pre>/train route set [destination1] ([destination2] [destination3...]) | <pre>/train route set [destination1] ([destination2] [destination3...]) | ||
/train route set outpost hillfort dungeon</pre> | /train route set outpost hillfort dungeon</pre> | ||
[[File:Pathfinding_routes_set.png]] | [[File:Pathfinding_routes_set.png|File:Pathfinding_routes_set.png]] | ||
To add additional destinations to the existing route, or to remove them, use these commands: | To add additional destinations to the existing route, or to remove them, use these commands: | ||
| Line 72: | Line 100: | ||
You can then use the destination command or property to start the route at a desired destination. Otherwise, the route is started from the beginning the moment the train hits a destination sign. To inspect the route of a train, use the base route command. The current destination the train has is highlighted green. | You can then use the destination command or property to start the route at a desired destination. Otherwise, the route is started from the beginning the moment the train hits a destination sign. To inspect the route of a train, use the base route command. The current destination the train has is highlighted green. | ||
<pre>/train route</pre> | <pre>/train route</pre> | ||
[[File:Pathfinding_route_info.png]] | [[File:Pathfinding_route_info.png|File:Pathfinding_route_info.png]] | ||
==== Persistence ==== | ==== Persistence ==== | ||
The route of a train can be saved globally under a name so it can later be applied to other trains instantly. | The route of a train can be saved globally under a name so it can later be applied to other trains instantly. | ||
<pre>/train route save [name]</pre> | <pre>/train route save [name]</pre> | ||
| Line 80: | Line 110: | ||
<pre>/train route load [name]</pre> | <pre>/train route load [name]</pre> | ||
Alternatively, it can be done using a property sign as well: | Alternatively, it can be done using a property sign as well: | ||
</translate> | |||
{{sign|[+train]|property|loadroute|myroute}} | {{sign|[+train]|property|loadroute|myroute}} | ||
<translate> | |||
</translate> | |||
Revision as of 17:30, 8 February 2021
Introduction
thumb|right|Setup of 3 destinations and a switcher sign to route trains between them
Trains can be routed to different locations in the Minecraft world by automatically switching the track. By placing signs the track network topology is configured, which pre-configured trains will follow to reach their destination.
Locations trains can go to are known as Destinations, which are designated using destination signs. Locations where track is being switched, as well as the end-locations, are known as Nodes in the network, which are designated using switcher signs. To enforce a single direction on the tracks, blocker signs can be employed, which disables routes that go against the flow of traffic.
Getting Started
Designate the destinations
Start by placing down destination signs with a name for the destination on the third line. The fourth line can be used to set a new destination to go to once a train goes over the sign, but can be left empty.
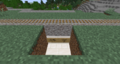
Station with destination sign. Trains can go here, are stopped for 30 seconds, then move on to the right.

Designate the switched nodes
Places where the track should be switched need to have an always-powered switcher sign placed. Now when a train moves over it that has a destination set, a route will be calculated and then the track is switched.
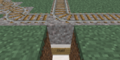
Switcher sign will automatically switch the track to go from/to any of the 3 directions.

Enforce one direction
When it is desirable that trains only ever go in one direction over a piece of track, an always-powered blocker sign can be used. This is useful when having two tracks side-by-side, each going in opposing directions. The path finding system will automatically ignore paths that are blocked by blocker signs.
![With [+train:left] trains coming from the left are blocked, only allowing movement from right to left. Similarly, [+train:right] and other directions can be used.](/thumb.php?f=Pathfinding_Blocker.png&width=120)
With [+train:left] trains coming from the left are blocked, only allowing movement from right to left. Similarly, [+train:right] and other directions can be used.
![With [+train:left] trains coming from the left are blocked, only allowing movement from right to left. Similarly, [+train:right] and other directions can be used.](/p/File:Pathfinding_Blocker.png)
Test it out
Place down a minecart on the track, and use the Destination command to set a destination:
/train destination [name]
/train destination output
Now give the minecart a push towards the switcher sign, and observe how it will automatically switch the track to send the train towards the destination. You can change the destination again and send it to the switcher again. Continue to experiment with multiple switchers, blockers and destinations.
If you run into a problem where the switcher appears to make a mistake, use the Reroute command to force a recalculation of all routing information:
/train reroute
It is also possible to use the property sign to set a destination:

Advanced
Once the basic system is understood, there are some more complicated features to discuss.
Debugger

The plugin offers a debug stick with which path finding information can be displayed. Use the stick item to click on rails to show information about the route(s) that can be taken. Sneak (shift) while clicking performs a reroute, which recalculates the track reachable from where you clicked. If you have multiple smaller rail networks, this can be more efficient than executing the global reroute command.
All destinations
Use the following command to get a stick item that displays all destinations reached from a given track:
/train debug destination
The track clicked is followed until a node of the track network is found, after which all routeable destinations are listed. For every destination the total distance to it is listed, and particles are displayed leading into it. If you find that a certain destination is not listed that should be, you can move further along the track clicking occasionally to find where the break is.
A single destination
Use the following command to debug a specific destination:
/train debug destination [destination]
Now when you click on the track, particles are displayed what route is taken to reach the destination. This is useful when debugging a specific destination so no particles are displayed for routes and destinations that aren't relevant to you.
Route Manager
Normally only one destination is set at a time. It is possible to set the next destination to go to on the destination sign itself, but that means you can only have one possible route. With the route manager a list of destinations to visit can be configured, and then applied to trains. Trains will then go down this list, advancing it every time they pass by a destination on it.
Commands
First, edit a train, then use the following commands to set a list of destinations:
/train route set [destination1] ([destination2] [destination3...])
/train route set outpost hillfort dungeon

To add additional destinations to the existing route, or to remove them, use these commands:
/train route add [destination1] ([destination2] [destination3...])
/train route remove [destination1] ([destination2] [destination3...])
You can then use the destination command or property to start the route at a desired destination. Otherwise, the route is started from the beginning the moment the train hits a destination sign. To inspect the route of a train, use the base route command. The current destination the train has is highlighted green.
/train route

Persistence
The route of a train can be saved globally under a name so it can later be applied to other trains instantly.
/train route save [name]
To load a saved route, this command can be used:
/train route load [name]
Alternatively, it can be done using a property sign as well: