Light-Cleaner

| |
| Repair glitched lighting in your world | |
| Spigot: | Light Cleaner |
|---|---|
| GitHub: | Light Cleaner |
Light Cleaner regenerates the light levels of blocks in your Minecraft world. It can do so around the player or for an entire world. The Spigot page has command instructions and configuration overview information.
Commands
The main command is /cleanlight with optionally some arguments
/cleanlight - regenerate lighting for all chunks you can see
/cleanlight 12 - regenerate lighting 25x25 chunks around you
/cleanlight world - regenerate lighting in the current world
/cleanlight world world1 - regenerate lighting for world1
/cleanlight abort - cancels any ongoing lighting operations
/cleanlight status - checks up on the status of the repairs
/cleanlight at [chunk_x] [chunk_z] [chunk_radius] (world) - regenerate lighting remotely (can be run from command blocks)
Repairing Singleplayer Worlds
If you have an existing singleplayer Minecraft world you want to repair but you don't have a server, or you want to repair a world on a different server without impacting your main one, read on.
Step 1. Download Paper
To run Light Cleaner you do need a paper or spigot server. Download the version compatible with your World from https://papermc.io/downloads/all
For modded minecraft hybrid servers exist like Arclight and Mohist that light cleaner can also work on, but setting these up with mods is more complicated and this section will not go into that.
Step 2. Installation
Prepare a new folder on your Desktop or somewhere like your c:// drive. In this tutorial I assume you created a folder at c://light-cleaner/. Adjust this based on your operating system. Ideally choose a folder whose path does not include spaces, but generally this should still work OK.
Next, copy the papermc.io jar you downloaded earlier into this folder.
Step 3. Copy your world
Find where your world data is saved in your Minecraft client. Typically this is in .minecraft/saves located in %appdata% (windows), your user home folder or similar. Copy this save world folder to the root installation folder you created in Step 2.
Rename the folder to "world" so that the server will properly load it on startup.
Step 4. Install Plugins
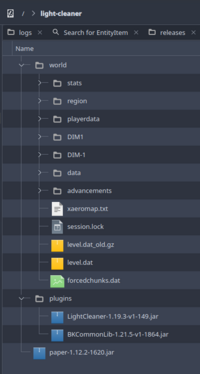
Create a "plugins" folder in the root server folder. Download Light Cleaner and BKCommonLib jars and put them inside this folder.
You should now have this folder structure:
Step 5. Run the Server
Make sure you already have a java runtime installed. If you just installed one, restart the PC once to make sure the environment updates.
Run the server once in a terminal window. On windows you do this by right-clicking into the server folder and opening a command prompt there. You might need to use cd C://light-cleaner to go to the right folder first. On linux this is probably easier.
Command (change the jar file name of the server to what you downloaded in step 1):
java -jar paper-1.12.2-1620.jar
This will first fail and ask you to agree to the EULA. Open the newly generated eula.txt in Notepad or another text editor and change eula=false to eula=true. Then save.
Run the same command again to start the server for real. It will probably do some Bukkit world migrations here, and it will warn about that in the terminal window.
Step 6. Run Light Cleaner
You can connect to localhost to see your server and confirm it loaded the world. You'll have to run op my_name in the terminal window first to give you access to the plugin.
Then while in the world you want to repair, run:
/cleanlight world
You can also do this from the terminal window without ever logging on, but it's a good idea to check the world was loaded correctly first.
/cleanlight world world
Step 7. Wait
You can periodically run cleanlight status in the terminal window to see how many chunks remain to be processed.
You might want to occasionally restart the server to avoid an out of memory situation. The process will resume automatically.
Step 8. Restructure
Stop the server by entering the stop command, or ctrl+c keyboard shortcut to send a stop signal. Wait for it to exit.
Now the process is done you need to restructure the world folder to be like Vanilla Minecraft again. Use the terminal commands below. Or do it in your file explorer.
Windows
move ./world_nether/DIM-1 ./world/DIM-1
move ./world_the_end/DIM1 ./world/DIM1
rmdir /s /q ./world_nether
rmdir /s /q ./world_the_end
Linux
mv ./world_nether/DIM-1 ./world/DIM-1
mv ./world_the_end/DIM1 ./world/DIM1
rm -rf ./world_nether
rm -rf ./world_the_end
And now it's done. You can rename the world folder back to the original save name and load it into Singleplayer Minecraft.
