/Portals
Introduction
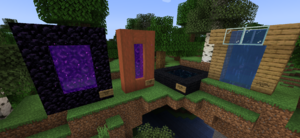
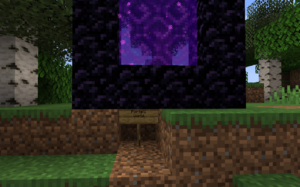
Besides commands, this plugin comes with the simplest cross-world teleportation solution: Actual portals. Walk from world to world simply, by walking into a portal. To make a portal, all you have to do is place a [portal] sign nearby a block structure that looks like a portal.
There are three types of portals to choose from:
- Nether portals
- End portals
- Water portals
Enable
This portal behavior must be enabled in MyWorlds' config.yml before they can be used. If portal signs aren't working, first check that all relevant portal types are enabled:
# Turns different types of portals on or off
# When the portal is disabled, MyWorlds will not handle the portal's logic
enabledPortals:
  # Turns handling of nether portal teleportation on or off
  # Vanilla Minecraft will handle nether portals when disabled
  netherPortal: true
  # Turns handling of end portal teleportation on or off
  # Vanilla Minecraft will handle end portals when disabled
  endPortal: true
  # Enables or disables the water stream portals
  waterPortal: true
Usage
Nether portals and End gateways
Standard nether portals and end gateways can also be used as portals. For a custom frame or shape, this command can be used to get a special item to place them down:
| Command: | /world giveportal [end/nether] |
|---|---|
| Permission: | myworlds.world.giveportal |
Water portals
To use water as a portal, the water must be surrounded on at least two sides with a solid block and at least one side with open air. This is to prevent random lakes to act as portals. With a hole in the ground you can prevent the water from flooding outwards. Water is counted as a solid block, so they can be infinitely wide.
Portal Sign
For each line:
- on the first line: [portal]
- on the second line the portal name. You can teleport to this portal by this name, for example, with /tpp [name].
- on the third line the portal or world name to teleport to. This is taken when the portal is entered.
- optionally on the fourth line the destination display name (otherwise uses portal/world name on third line). Can be left empty.
Placement
Players are teleported to the first open space above the portal sign. You can put the portal sign underground, and the player will be teleported on top of the solid blocks above. It is safe to put the portal sign below the portal itself, cyclical teleports are prevented.
Cleaning up portals
If you want to remove a portal you lost, you can remove the saved portal data from: root\plugins\My Worlds\portals.txt
Teleporting to portals
Please see the /world teleport and /tpp commands on the Commands page
Use with Traincarts
The Traincarts plugin supports this type of sign for creating (cross-world) train teleporters. See this page for more information.
Rejoin Portals
Rejoin portals are special portals which mimic the /world rejoin command. Rejoining means a player is teleported to the last position of the world name put on the sign. You must specify one of the worlds that should be rejoined on the last line.
To make sure rejoining 'world' also rejoins 'world_nether' if the player was last in the nether, see the lastposition command to merge worlds. This way players also rejoin the last world they were on when rejoining one of the merged worlds.
Additional Options
Additional options that don't really fit on the sign can be configured using the /world setportaloption <portal name> <option> <value> command. If you want to set per portal whether mobs and items can pass through the portal, rather than relying on the global option in config.yml, this can be set per portal here:
/world setportaloption hub playersonly [no/yes]


