Difference between revisions of "TrainCarts/Attachments/Item"
Bergerkiller (talk | contribs) (Created page with "« Go back File:attachments_item_main.png|thumb|Main section of the item appearance menu, showing a 3d preview of the selected...") |
Bergerkiller (talk | contribs) |
||
| (8 intermediate revisions by the same user not shown) | |||
| Line 1: | Line 1: | ||
| + | <languages/> | ||
| + | <translate> | ||
| + | <!--T:1--> | ||
[[Special:MyLanguage/TrainCarts/Attachments|« Go back]] | [[Special:MyLanguage/TrainCarts/Attachments|« Go back]] | ||
| + | <!--T:2--> | ||
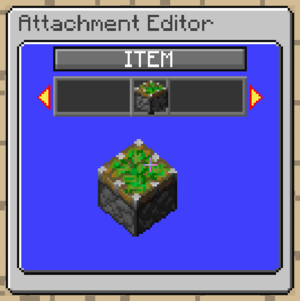
[[File:attachments_item_main.png|thumb|Main section of the item appearance menu, showing a 3d preview of the selected item]] | [[File:attachments_item_main.png|thumb|Main section of the item appearance menu, showing a 3d preview of the selected item]] | ||
| − | + | ||
| + | ==Appearance== <!--T:3--> | ||
| + | |||
| + | <!--T:4--> | ||
| + | By pressing Jump (spacebar) a menu can be opened to select a different item or block. If a resource pack is configured, an inventory menu is opened with the custom models that exist in the resource pack. Otherwise, a grid of blocks and items is displayed. | ||
| + | |||
| + | <!--T:5--> | ||
| + | Additional menus can be opened by pressing Up/Down (W/S). It is here that special properties such as ''Unbreakable'' and ''Custom Model Data'' can be set. This might be important for custom resource pack models. For some items, such as tools, the durability of the item is configurable using Left/Right (A/D) input. | ||
| + | |||
| + | <!--T:6--> | ||
| + | Instead of using the in-map menus you can also drop an item from your inventory with this menu open to set an item. | ||
| + | |||
| + | ===Item Model Dialog=== <!--T:7--> | ||
| + | |||
| + | <!--T:8--> | ||
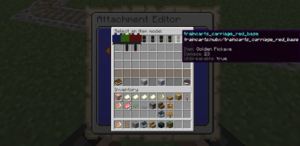
| + | [[File:item_model_dialog.png|thumb|Item Model Dialog is opened to select an item model]] | ||
| + | When you have a resource pack configured in your <code>server.properties</code> an item model search dialog becomes available. This dialog has easier click navigation of the entire resource pack, and includes a search dialog. You can open this dialog anywhere as a creative menu using the <code>/train model search</code> command. | ||
| + | |||
| + | ==Position== <!--T:9--> | ||
| + | |||
| + | <!--T:10--> | ||
| + | When the item type is selected, an additional "mode" and "transform" option is made available in the '''Position menu'''. This controls ''how'' the item is displayed. If the server version is below 1.20, then the mode option is unavailable and only display using armorstands is supported. | ||
| + | |||
| + | === Mode === <!--T:11--> | ||
| + | |||
| + | <!--T:12--> | ||
| + | {| class="wikitable" | ||
| + | |- | ||
| + | ! Mode !! Function | ||
| + | |- | ||
| + | | '''Hybrid''' || Uses a display entity for Minecraft clients on version 1.20 or later (viaversion support). Uses an armorstand for clients on versions before that. Display scale is not configurable. | ||
| + | |- | ||
| + | | '''Armorstand''' || Uses an armorstand to display the item. Rotation will be less smooth than with display entities. | ||
| + | |- | ||
| + | | '''Display''' || Uses a display entity to display the item. Rotation will be smooth, and scale can be configured in the '''Position menu'''. | ||
| + | |} | ||
| + | |||
| + | === Transform === <!--T:13--> | ||
| + | |||
| + | <!--T:14--> | ||
| + | Sets what equipment slot the item is put in. In hybrid mode, shows a display or armorstand icon to represent how the item is positioned. This is important for smooth rotations. A yellow "S" means the armorstand is small, or, 'baby'. The available slots are head, left hand, right hand, chestplate, legs and feet. For the display mode, additional options are available such as GUI, ground and fixed (item frame). | ||
| + | |||
| + | === Size === <!--T:15--> | ||
| + | |||
| + | <!--T:16--> | ||
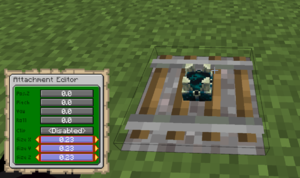
| + | [[File:item_size.png|thumb|Item size of a display-mode item attachment is configured]] | ||
| + | If the mode is set to display, then the item scale size (x/y/z) can be set as well. Pressing down (S) on the z-axis selects all three to uniform-scale the item. | ||
| + | |||
| + | === Clip === <!--T:17--> | ||
| + | |||
| + | <!--T:18--> | ||
| + | If the mode is set to display, then a clip size can be set. By default this is set to disabled, which disables view clipping entirely. It can help client performance to set this clip size to something roughly the size of the item. That way when players don't look at the item, it is not rendered. | ||
| + | |||
| + | <!--T:19--> | ||
| + | Armorstands don't support this feature, and they have a problem with models disappearing when looking away. For this reason, stick to hybrid or display mode if you can. | ||
| + | </translate> | ||
Latest revision as of 20:33, 30 December 2023
Appearance
By pressing Jump (spacebar) a menu can be opened to select a different item or block. If a resource pack is configured, an inventory menu is opened with the custom models that exist in the resource pack. Otherwise, a grid of blocks and items is displayed.
Additional menus can be opened by pressing Up/Down (W/S). It is here that special properties such as Unbreakable and Custom Model Data can be set. This might be important for custom resource pack models. For some items, such as tools, the durability of the item is configurable using Left/Right (A/D) input.
Instead of using the in-map menus you can also drop an item from your inventory with this menu open to set an item.
Item Model Dialog
When you have a resource pack configured in your server.properties an item model search dialog becomes available. This dialog has easier click navigation of the entire resource pack, and includes a search dialog. You can open this dialog anywhere as a creative menu using the /train model search command.
Position
When the item type is selected, an additional "mode" and "transform" option is made available in the Position menu. This controls how the item is displayed. If the server version is below 1.20, then the mode option is unavailable and only display using armorstands is supported.
Mode
| Mode | Function |
|---|---|
| Hybrid | Uses a display entity for Minecraft clients on version 1.20 or later (viaversion support). Uses an armorstand for clients on versions before that. Display scale is not configurable. |
| Armorstand | Uses an armorstand to display the item. Rotation will be less smooth than with display entities. |
| Display | Uses a display entity to display the item. Rotation will be smooth, and scale can be configured in the Position menu. |
Transform
Sets what equipment slot the item is put in. In hybrid mode, shows a display or armorstand icon to represent how the item is positioned. This is important for smooth rotations. A yellow "S" means the armorstand is small, or, 'baby'. The available slots are head, left hand, right hand, chestplate, legs and feet. For the display mode, additional options are available such as GUI, ground and fixed (item frame).
Size
If the mode is set to display, then the item scale size (x/y/z) can be set as well. Pressing down (S) on the z-axis selects all three to uniform-scale the item.
Clip
If the mode is set to display, then a clip size can be set. By default this is set to disabled, which disables view clipping entirely. It can help client performance to set this clip size to something roughly the size of the item. That way when players don't look at the item, it is not rendered.
Armorstands don't support this feature, and they have a problem with models disappearing when looking away. For this reason, stick to hybrid or display mode if you can.


